"Do It Yourself" Player
If you decide to build your own Beetangle Player, here is described how. It’s simple and anybody with basic IT knowledge should be OK. Choose quality hw components, as for example cheep SD card can cause lot of troubles (we went through that already :-)
Internet is full of info how to work with Raspberry Pi, which is base of Beetangle Player. We are describing here just basic steps, Google help you with the rest.
What you will need
To build and set up your own Beetangle Player using the Raspberry Pi, you need the following hardware components:
- The Raspberry Pi model B (512MB RAM)
- An SD card - at least 8GB. For best performance, this should be a Class 10 SDHC card. We strongly recommend the SanDisk brand, but most other makes should work too
- Any kind of case for the Pi - it depends on your imagination and creativity
- An USB power supply with micro-USB plug - Pi can be powered from standard USB chargers or even from TV USB port. Any with at least 1A output should be OK
- (optional) Supported wifi USB dongle - in case you don’t want to use wired ethernet connection (recommended) you may configure any supported USB wifi adapter. List of supported ones can be found here: http://elinux.org/RPi_USB_Wi-Fi_Adapters
You will also need:
- network and internet connection - preferably wired, wireless is however possible
- hdmi or RCA analog monitor/TV
- USB keyboard
Installation
Put everything together and download the image of SD card. Unzip the file to your drive first, then extract it to SD card using the instructions for your operating system:
http://beetangle.com/download/beetangle.player.img.zip
For Mac users:
- Insert the SD card into your Mac (either directly or using an SD card reader)
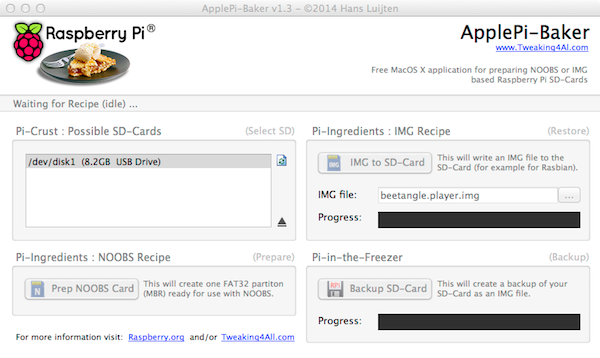
- Download and run ‘Apple Pi Baker’, a super-simple program for putting an operating system onto an SD card. You can find the program at this link: http://www.tweaking4all.com/hardware/raspberry-pi/macosx-apple-pi-baker/
- Select your SD card from the list on the left, select the unzipped image file on the right, and click on ‘IMG to SD-card’
- Once the program has finished putting the IMG file onto the card, remove the card correctly and insert it into your Pi and start it by plug it in to power
For Windows users:
- Insert the SD card into your PC and format it using the FAT format
- Check to see that the card is showing up under ‘My Computer’
- Download and run ‘Win32 Disk Imager’, a standard program for putting an operating system onto an SD card. You can find the program at this link: http://sourceforge.net/projects/win32diskimager/
- Note: You may need to run the program as an Administrator (right-click and select ‘Run as Administrator’)
- Select the image and the SD card drive to which it will be extracted. Click Write and wait for the process to finish
- Exit Win32 Disk Manager and remove the SD card
- Insert the SD card into your Raspberry Pi and start it by plug it in to power
Configuring the Player
If you plan to use the ethernet cable to connect DIY Beetangle Player to internet, you can switch to standard procedure of configuring it now: Beetangle Player
In case you’d like to use wifi connection you can do it manually using the wicd-curses utility (search Google for manual or use this excelent one: http://www.raspyfi.com/wi-fi-on-raspberry-pi-a-simple-guide/) or alternatively you can try this script: https://github.com/shamiao/raspi-wifi-blindscript
Other tips and tricks
Beetangle player is running standard Raspbian, which is a clone of Debian Wheezy distribution. Most of your Linux skills can be used with Rasbian and Raspberry Pi.
You can connect to SSH with default username and password pi/beetangle.
You can configure your Pi by running raspi-config on it.
Don't be afraid to experiment and enjoy it. You can always use the clean Beetangle Player image to make a fresh Player install.